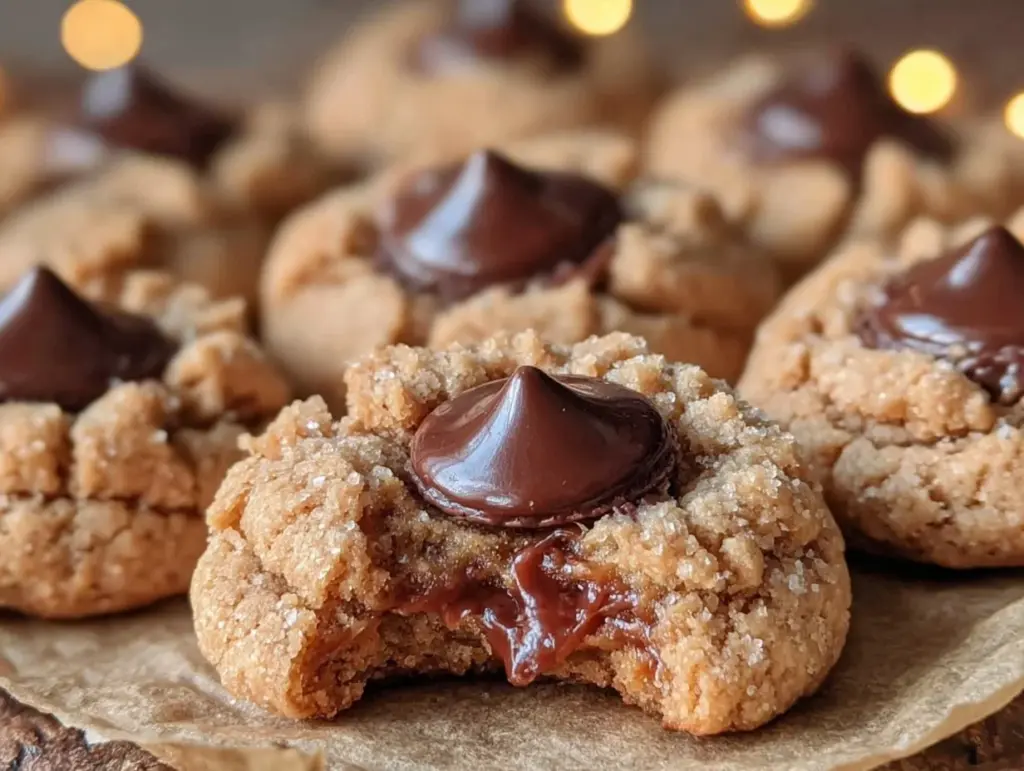
The smell of freshly baked peanut butter blossoms with a melty Hershey Kiss in the center takes me right back to holiday kitchens filled with laughter and the clatter of cookie sheets. Honestly, there’s something magical about this classic peanut butter cookies recipe that never gets old. I first whipped up these delightful treats when I wanted a quick, crowd-pleasing cookie for a last-minute family gathering—and let me tell you, they vanished faster than I could blink.
Peanut butter blossoms are more than just cookies; they’re a nostalgic bite of sweetness wrapped in a chewy peanut butter hug topped off with that iconic chocolate kiss. Over the years, I’ve tested and tweaked this recipe several times, perfecting it to get just the right balance between soft, chewy cookie and crisp edges. If you’re a fan of Hershey Kiss cookies or peanut butter treats, this recipe will become your go-to for every holiday, bake sale, or cozy night in.
Whether you’re new to baking or a seasoned pro, this delicious peanut butter blossoms recipe is straightforward, foolproof, and guaranteed to win hearts. Plus, it’s made with simple ingredients you probably already have on hand, making it perfect for those “I want cookies now” moments. Trust me, after baking these dozens of times, I can say with confidence that these peanut butter blossoms with Hershey Kiss cookies will be a staple in your kitchen too.
Why You’ll Love This Recipe
Let me break down why this peanut butter blossoms recipe stands out from the cookie crowd:
- Quick & Easy: You can whip up the dough and have these beauties in the oven in under 20 minutes, perfect for those spontaneous cookie cravings.
- Simple Ingredients: No fancy or hard-to-find items here—just classic pantry staples like peanut butter, sugar, flour, and, of course, Hershey Kisses.
- Perfect for Every Occasion: Whether it’s holiday baking, a school party, or a casual treat, these cookies are always a hit.
- Crowd-Pleaser: Kids love them, adults adore them, and they’re often the first batch to disappear from the cookie platter.
- Unbelievably Delicious: The chewy, peanut buttery base with a melty chocolate center is pure comfort food at its best.
This isn’t just any peanut butter cookie recipe. The secret to these perfect Hershey Kiss cookies is rolling the dough balls in sugar before baking, creating a slightly crisp shell while keeping the inside soft and tender. And placing the chocolate kiss on right after baking lets it soften just enough to melt without losing its shape. It’s a little technique I stumbled upon after a few batches, and it makes all the difference.
Honestly, biting into these cookies feels like a warm hug on a chilly day—comfort food reimagined with a simple twist that makes them unforgettable.
What Ingredients You Will Need
This peanut butter blossoms recipe calls for straightforward ingredients that create a rich, flavorful cookie with that classic Hershey Kiss finish. Here’s what you’ll need:
- Peanut Butter: 1 cup (smooth or chunky, depending on your texture preference). I usually go with a natural, no-stir variety for the best flavor.
- Granulated Sugar: 1 cup, plus extra for rolling the dough balls (gives the cookies a pretty crackled surface).
- Brown Sugar: 1/2 cup packed, adds moisture and a subtle caramel note.
- Unsalted Butter: 1/2 cup (1 stick), softened to room temperature.
- Egg: 1 large, at room temperature (helps bind the dough).
- Vanilla Extract: 1 teaspoon, for a warm, sweet aroma.
- All-Purpose Flour: 1 3/4 cups, sifted for a light texture.
- Baking Soda: 1 teaspoon, the leavening agent that gives the cookies a gentle rise.
- Salt: 1/2 teaspoon, balances the sweetness.
- Hershey Kisses: About 36, unwrapped and ready to top each cookie.
Optional tips: You can swap regular peanut butter for a natural or organic variety if you prefer a less sweet, more authentic peanut flavor. For a gluten-free twist, try almond flour or a 1:1 gluten-free flour blend, though baking times might vary slightly.
Equipment Needed
- Mixing Bowls: At least one large bowl for the dough and a small one for dry ingredients.
- Electric Mixer or Stand Mixer: Makes creaming the butter and sugars much easier, but a sturdy whisk and some elbow grease will do in a pinch.
- Baking Sheets: Two standard-sized sheets work best to spread out your dough balls.
- Parchment Paper or Silicone Baking Mats: Essential to prevent sticking and promote even baking.
- Spoon or Cookie Scoop: A medium cookie scoop (about 1.5 tablespoons) helps keep cookie sizes consistent.
- Cooling Rack: For letting the cookies cool properly and avoid sogginess.
If you don’t have a cookie scoop, a regular tablespoon works fine—just try to keep the dough portions as uniform as possible. For baking sheets, I recommend heavy-duty non-stick pans; lighter pans can brown the bottoms too quickly. After years of baking, I’ve found silicone mats to be a worthwhile investment—they clean up easily and help cookies bake evenly.
Preparation Method

- Preheat your oven to 375°F (190°C). Line two baking sheets with parchment paper or silicone mats to keep the cookies from sticking and to help with even baking. This step usually takes about 5 minutes.
- Mix the dry ingredients. In a medium bowl, whisk together 1 3/4 cups all-purpose flour, 1 teaspoon baking soda, and 1/2 teaspoon salt. Set aside while you prepare the wet ingredients. It’s a good idea to sift the flour for a lighter cookie texture.
- Cream the butter and sugars. In a large bowl, use an electric mixer to beat 1/2 cup softened unsalted butter, 1 cup granulated sugar, and 1/2 cup packed brown sugar until the mixture is light and fluffy (about 3 minutes). The color should lighten noticeably, signaling good aeration.
- Add peanut butter, egg, and vanilla. Beat in 1 cup peanut butter, 1 large room-temperature egg, and 1 teaspoon vanilla extract until smooth and fully combined. The dough will look thick and creamy.
- Incorporate dry ingredients. Gradually add the flour mixture to the wet ingredients, mixing on low speed until just combined. Avoid overmixing to keep the cookies tender.
- Shape the dough. Using a cookie scoop or tablespoon, scoop out dough balls and roll each one in extra granulated sugar. This step adds a beautiful crackled effect and a little extra sweetness on the outside.
- Arrange dough balls on baking sheets. Place them about 2 inches apart to allow for spreading. You’ll want roughly 18 cookies per sheet.
- Bake the cookies. Bake in the preheated oven for 8 to 10 minutes until the edges are set but the centers look slightly underbaked and soft. This ensures a chewy texture once cooled.
- Add Hershey Kisses. Immediately after removing the cookies from the oven, press a single Hershey Kiss into the center of each cookie. The heat will soften the chocolate just enough to create that signature melty blossom effect.
- Cool on a wire rack. Let the cookies cool completely on the baking sheet for about 5 minutes, then transfer to a wire rack to cool fully. This prevents them from becoming soggy on the bottom.
Pro tip: Don’t skip pressing the Kiss right out of the oven—if you wait too long, the chocolate won’t melt properly. Also, if your dough feels too soft or sticky while shaping, pop it in the fridge for 15 minutes to firm up.
Cooking Tips & Techniques
Getting peanut butter blossoms just right can be a little tricky, but trust me, it’s worth the attention to detail.
- Measuring Flour: Too much flour can make cookies dry and crumbly. I spoon the flour into the measuring cup and level it off with a knife rather than scooping directly from the bag to avoid packing.
- Don’t Overbake: The secret to chewy cookies is pulling them out when the centers look slightly underdone. They’ll finish cooking on the hot baking sheet.
- Rolling in Sugar: This step isn’t just for looks. It creates a thin, crisp shell that contrasts beautifully with the soft peanut butter inside.
- Chocolate Placement: Pressing the Hershey Kiss immediately after baking softens the chocolate just right—wait too long and it won’t melt; do it too early and the cookie can lose shape.
- Chilling Dough: If your kitchen is warm or your dough feels too soft, chilling it for 15-30 minutes helps maintain shape and prevents excessive spreading.
From my experience, using a stand mixer saves time, but hand mixing is totally doable. Also, watch your oven hotspots; rotating the baking sheet halfway through helps cookies bake evenly. I learned the hard way that skipping parchment paper usually means stuck cookies and broken backs!
Variations & Adaptations
Want to switch things up with your peanut butter blossoms? Here are some fun twists I’ve tried or recommend:
- Chocolate Peanut Butter Blossoms: Add 1/4 cup cocoa powder to the dry ingredients for a chocolatey twist. The Hershey Kiss on top pairs perfectly with the richer dough.
- Gluten-Free Version: Swap all-purpose flour for a certified gluten-free blend like Bob’s Red Mill 1-to-1. The texture is slightly different but still delicious.
- Nut-Free Alternative: Use sunflower seed butter instead of peanut butter for allergy-friendly cookies. The flavor is unique but still works well with the chocolate kiss.
- Festive Toppings: Instead of classic Hershey Kisses, try mint-flavored kisses or even mini peanut butter cups for holiday fun.
- Vegan Option: Use a flax egg (1 tablespoon ground flaxseed + 3 tablespoons water) and vegan butter substitute. Choose dairy-free chocolate kisses to keep it vegan.
One of my favorite personal adaptations is sprinkling a tiny pinch of sea salt on top of the Hershey Kiss right after pressing—it adds a little salty contrast that’s just dreamy.
Serving & Storage Suggestions
These peanut butter blossoms are best served at room temperature, allowing the chocolate to be soft and the cookie chewy. They make a perfect treat alongside a cold glass of milk or a warm cup of coffee or tea.
If you’re serving at a party, arrange them on a festive platter or tiered cookie stand to show off their charming appearance. They’re also fantastic packed in decorative tins or bags for gifts.
For storage, keep cookies in an airtight container at room temperature for up to 5 days. If you want to keep them longer, they freeze beautifully—just layer parchment paper between cookies and store in a freezer-safe bag or container for up to 3 months.
When reheating, pop frozen cookies in the microwave for about 10 seconds to soften the chocolate again. Just be careful not to overheat or the cookie can become tough. Over time, the flavors meld, making the peanut butter and chocolate even more harmonious.
Nutritional Information & Benefits
Each peanut butter blossom cookie (approximately 30g) contains roughly:
| Calories | Fat | Protein | Carbohydrates | Sugar |
|---|---|---|---|---|
| 130 | 7g | 3g | 15g | 10g |
Peanut butter provides a good dose of protein and healthy fats, helping keep you fuller longer than typical sweets. Plus, the natural peanut oils add moisture and flavor without needing extra butter. That said, these cookies are definitely a treat, so moderation is key.
They’re naturally gluten-containing unless you swap flours, and contain nuts and dairy, so be mindful of allergies. From a wellness standpoint, I appreciate that this recipe uses real ingredients with no artificial additives, which is always a win in my book.
Conclusion
In short, this delicious peanut butter blossoms recipe with Hershey Kiss cookies is a beloved classic that’s easy to make, irresistibly tasty, and perfect for any occasion. I love how the chewy peanut butter cookie meets the melty chocolate kiss in a simple, satisfying bite that feels both nostalgic and special.
Feel free to tweak the recipe to your liking, whether that means trying different nut butters, adding a dash of cinnamon, or experimenting with festive toppings. Baking these cookies has been a joyful ritual for me, and I hope it brings as much happiness to your kitchen as it has to mine.
Give it a try, share your results, or tell me about your own peanut butter blossom adventures in the comments below—I’d love to hear your stories and tips!
Happy baking and may your cookie jar always be full!
FAQs
How do I prevent my peanut butter blossoms from spreading too much?
Make sure to chill the dough for 15-30 minutes if it feels too soft. Also, avoid over-greasing your baking sheet and space the dough balls at least 2 inches apart. Using parchment paper or silicone mats helps control spreading as well.
Can I make peanut butter blossoms ahead of time?
Absolutely! You can prepare the dough a day in advance and refrigerate it, then bake fresh when you’re ready. Alternatively, bake the cookies and store them in an airtight container for up to 5 days or freeze for longer storage.
What if I don’t have Hershey Kisses—can I use something else?
Yes! You can substitute with mini peanut butter cups, chocolate chips, or other small chocolates. Just add them right after baking to get that soft, melty center effect.
Are peanut butter blossoms gluten-free?
The traditional recipe uses all-purpose flour, so it’s not gluten-free. However, you can swap the flour for a gluten-free blend to make it suitable for gluten-sensitive diets.
How do I keep the Hershey Kiss from melting off the cookie?
Press the Kiss into the cookie immediately after baking while the cookie is hot but still soft. If you wait too long, the chocolate won’t stick or melt properly. The warmth of the cookie helps the Kiss adhere without sliding off.
Pin This Recipe!


Delicious Peanut Butter Blossoms Recipe
- Total Time: 25 minutes
- Yield: 36 cookies 1x
Description
Classic peanut butter cookies topped with melty Hershey Kisses, perfect for holidays, bake sales, or cozy nights in. This recipe yields soft, chewy cookies with crisp edges and a signature chocolate center.
Ingredients
- 1 cup peanut butter (smooth or chunky)
- 1 cup granulated sugar, plus extra for rolling
- 1/2 cup packed brown sugar
- 1/2 cup (1 stick) unsalted butter, softened
- 1 large egg, room temperature
- 1 teaspoon vanilla extract
- 1 3/4 cups all-purpose flour, sifted
- 1 teaspoon baking soda
- 1/2 teaspoon salt
- About 36 Hershey Kisses, unwrapped
Instructions
- Preheat your oven to 375°F (190°C). Line two baking sheets with parchment paper or silicone mats.
- In a medium bowl, whisk together the flour, baking soda, and salt. Set aside.
- In a large bowl, beat the softened butter, granulated sugar, and brown sugar with an electric mixer until light and fluffy, about 3 minutes.
- Add peanut butter, egg, and vanilla extract to the butter mixture and beat until smooth and combined.
- Gradually add the dry ingredients to the wet ingredients, mixing on low speed until just combined. Avoid overmixing.
- Using a cookie scoop or tablespoon, scoop dough balls and roll each in extra granulated sugar.
- Place dough balls about 2 inches apart on the prepared baking sheets, about 18 per sheet.
- Bake for 8 to 10 minutes until edges are set but centers look slightly underbaked and soft.
- Immediately press one Hershey Kiss into the center of each cookie after removing from the oven.
- Let cookies cool on the baking sheet for 5 minutes, then transfer to a wire rack to cool completely.
Notes
Roll dough balls in granulated sugar before baking for a crackled surface. Press Hershey Kiss into cookies immediately after baking to soften chocolate without losing shape. Chill dough 15-30 minutes if too soft or sticky. Avoid overbaking to keep cookies chewy.
- Prep Time: 15 minutes
- Cook Time: 10 minutes
- Category: Dessert
- Cuisine: American
Nutrition
- Serving Size: 1 cookie (approximat
- Calories: 130
- Sugar: 10
- Fat: 7
- Carbohydrates: 15
- Protein: 3
Keywords: peanut butter blossoms, Hershey Kiss cookies, peanut butter cookies, holiday cookies, easy cookie recipe, chewy cookies