The smell of freshly baked slider buns filled with layers of savory Italian meats, tangy pickles, and melted cheese is honestly one of my favorite game day memories. I first whipped up these Savory Italian Sub Sliders during a lively family gathering, and from that moment on, they became the unofficial star of every casual get-together. You know that moment when everyone reaches for seconds (and thirds)? Yeah, these sliders bring that kind of joy. They’re perfect for feeding a hungry crowd without the fuss of individual sandwiches or fancy plating.
What makes these sliders so special, in my experience, is the balance of bold flavors—spicy pepperoni, savory ham, and the zing from Italian dressing all packed into soft, buttery rolls. Plus, they’re super easy to make, which is a lifesaver when you’re juggling snacks, drinks, and all the chaos of game day or a weekend party. As someone who’s tested this recipe multiple times (and tweaked the meat-to-cheese ratio to perfection), I can tell you these sliders hit the spot every single time.
If you’re wondering whether these sliders are worth your time, trust me—they are. Whether you’re feeding a crowd of hungry friends or just want a crowd-pleasing snack that’s a little different from the usual chips and dip, these Savory Italian Sub Sliders will become your go-to. Plus, they’re flexible enough to suit picky eaters and those who love a bold Italian flavor punch alike.
Why You’ll Love This Recipe
- Quick & Easy: Comes together in about 30 minutes, which means less time cooking and more time cheering on your team.
- Simple Ingredients: You likely have most of these in your pantry or fridge already—no last-minute grocery runs needed.
- Perfect for Gatherings: Great for game day, potlucks, or casual family dinners where everyone wants something tasty but fuss-free.
- Crowd-Pleaser: Kids and adults alike can’t get enough of the melty cheese and zesty Italian meats.
- Unbelievably Delicious: The combo of fresh sandwich rolls, Italian dressing, and layers of meats is comfort food with a fresh twist.
What really sets these sliders apart is the little trick of drizzling Italian dressing over the meat layer before topping with cheese—this keeps every bite juicy and full of flavor without making the bread soggy. I also like to press the sliders gently after assembling to help everything meld together nicely. Honestly, this isn’t just another sandwich; it’s the best version I’ve found for feeding a crowd without losing any flavor or texture.
It’s the kind of recipe that makes guests close their eyes and smile after a bite—the perfect blend of hearty and fresh. Whether you’re looking to impress without stress or just want a reliable crowd-pleaser, these Savory Italian Sub Sliders deliver every time.
What Ingredients You Will Need
This recipe uses simple, wholesome ingredients to deliver bold flavor and satisfying texture without the fuss. Most are pantry staples or easy to find at your local grocery store.
- Slider Buns: 12 soft sandwich rolls or dinner slider buns (I prefer Hawaiian rolls for a slightly sweet contrast, but classic white buns work great too)
- Italian Deli Meats:
- 6 oz sliced Genoa salami (adds spice and depth)
- 6 oz sliced ham (for savory balance)
- 6 oz sliced pepperoni (for that classic Italian zing)
- Cheese: 8 oz provolone cheese, sliced (melts beautifully and complements the meats)
- Vegetables:
- 1 cup shredded iceberg lettuce (for crunch)
- 1 large tomato, thinly sliced (freshness)
- 12 dill pickle slices (adds tang)
- 1/4 cup thinly sliced red onion (optional, for a subtle bite)
- Condiments & Extras:
- 1/3 cup Italian dressing (I usually use Ken’s Steakhouse Italian; it’s tangy and flavorful)
- 2 tablespoons mayonnaise (for a creamy touch)
- 1 teaspoon dried oregano (sprinkled over for that authentic Italian flavor)
- Butter: 2 tablespoons unsalted butter, melted (to brush on tops for a golden finish)
Ingredient Tips: For best texture, grab firm, fresh sandwich rolls. If you want to keep it gluten-free, you can swap the buns for gluten-free slider rolls or sturdy lettuce wraps. Feel free to use turkey or roast beef if you want a milder meat option. And if you’re feeling adventurous, add banana peppers or a splash of balsamic glaze for a twist!
Equipment Needed
- A 9×13-inch baking dish or casserole pan—perfect size for fitting all the sliders snugly so they hold together while baking.
- A sharp knife for slicing buns and vegetables cleanly.
- A small bowl for mixing the Italian dressing and mayonnaise together.
- A pastry brush to evenly coat the buns with melted butter for that beautiful golden crust.
- Aluminum foil to cover the sliders while baking, ensuring the cheese melts perfectly without drying out.
If you don’t have a baking dish that size, you can use two smaller pans or even a rimmed cookie sheet, but keep an eye on the baking time as it might vary slightly. For a budget-friendly option, a simple glass or metal casserole dish works just fine—no fancy equipment needed here! Also, I recommend keeping your knives sharp; it makes prepping veggies and slicing the slider buns way easier and safer.
Preparation Method

- Preheat your oven to 350°F (175°C). This moderate temperature helps the cheese melt evenly without drying out the buns. Prep your baking dish by lightly greasing it or lining it with parchment paper for easy cleanup.
- Slice the slider buns in half horizontally. Arrange the bottom halves snugly in the baking dish so they form a solid base. This helps the sliders hold their shape when baked.
- Mix the Italian dressing and mayonnaise in a small bowl. This combo will be your flavorful spread that keeps everything moist and tangy. Spread this mixture evenly over the bottom halves of each bun.
- Layer the Italian deli meats evenly over the buns. Start with the ham, then the salami, and finish with pepperoni. Try to distribute the slices evenly so each slider gets a balanced bite of all three meats. This layering is key for that classic Italian flavor burst.
- Sprinkle dried oregano over the meats. It’s a small touch but adds that authentic Italian aroma and flavor.
- Top the meats with provolone cheese slices. Make sure the cheese covers the meats so it melts into a gooey blanket during baking.
- Place the top halves of the slider buns over the cheese. Press down gently to compact the layers slightly—that helps everything meld together nicely during baking.
- Brush the tops of the buns with melted butter. This step gives the sliders a golden, shiny crust that’s irresistible.
- Cover the baking dish tightly with aluminum foil. This traps steam and helps melt the cheese perfectly while keeping the buns soft.
- Bake for 20 minutes. After this, remove the foil and bake uncovered for another 5 minutes to crisp up the tops just a bit.
- Remove from oven and let the sliders rest for 5 minutes. This little wait time lets the cheese set slightly so the sliders hold together better when you cut them.
- Add fresh toppings: Lift the top buns and layer shredded lettuce, tomato slices, pickle slices, and red onion (if using). Replace the top buns gently.
- Cut the sliders apart carefully. Use a sharp knife or kitchen shears to slice between the buns. Serve warm and enjoy!
Pro Tip: If the sliders seem a bit soggy after baking, a quick toast under the broiler for 1-2 minutes (watch closely!) can help crisp up the tops without drying out the filling.
Cooking Tips & Techniques
One thing I’ve learned from making these sliders over and over is that layering matters—don’t rush the assembly. Even distribution of meats and cheese ensures every bite has that perfect balance. Also, brushing the buns with melted butter before baking is a game changer; it adds flavor and helps the buns brown beautifully.
Watch your oven closely during the last few minutes of baking to avoid overcooking, which can dry out the bread. Using foil to cover the sliders while baking traps moisture and melts the cheese evenly, but removing the foil toward the end crisps up the tops just right.
For multitasking on game day, prep the meat and veggies ahead of time and assemble right before baking. That way, you’re not stuck in the kitchen when the game starts. If you want to save time, you can even assemble the sliders the night before, cover tightly, and bake fresh just before serving.
Lastly, don’t be afraid to customize the Italian dressing mix—sometimes I add a pinch of garlic powder or crushed red pepper flakes to give it a little extra kick. Cooking is all about making the recipe work for you, after all!
Variations & Adaptations
- Vegetarian Version: Swap the deli meats for grilled veggies like zucchini, roasted red peppers, and marinated artichokes. Add sliced mozzarella or provolone for melty goodness.
- Low-Carb Option: Use lettuce leaves or low-carb wraps instead of buns. Layer the same meats and cheeses for a satisfying bite without the carbs.
- Spicy Kick: Add sliced banana peppers or a drizzle of spicy Italian dressing. You can also swap regular pepperoni for spicy pepperoni or add a dash of crushed red pepper flakes.
- Gluten-Free: Use gluten-free slider buns or rolls. Most gluten-free breads hold up well when baked with toppings, just watch baking times.
- Personal Twist: I sometimes add a smear of pesto on the bun bottoms for a fragrant, herbal note that pairs beautifully with the meats and cheese.
Serving & Storage Suggestions
Serve these sliders warm for the ultimate melty, savory experience. They pair wonderfully with classic game day sides like potato chips, coleslaw, or a crisp green salad. For drinks, cold beer or a sparkling Italian soda really complement the flavors.
If you have leftovers (which is rare, but it happens!), wrap the sliders tightly in foil or plastic wrap and store in the fridge for up to 3 days. To reheat, unwrap and place in a 350°F (175°C) oven for about 10-15 minutes until warmed through and the cheese is melty again. Avoid the microwave if you want to keep the bread from turning soggy.
These sliders actually taste even better the next day when the flavors have had time to mingle, so feel free to make them ahead for easy entertaining!
Nutritional Information & Benefits
Each slider (based on 12 servings) contains approximately:
| Nutrient | Amount |
|---|---|
| Calories | 280 |
| Protein | 15g |
| Fat | 18g |
| Carbohydrates | 18g |
| Fiber | 1g |
| Sodium | 600mg |
The Italian deli meats provide a solid dose of protein, which helps keep you full during long game days or gatherings. Provolone cheese offers calcium and adds to the protein count. Using fresh veggies like lettuce and tomato adds fiber and vitamins. Just a heads-up: deli meats can be higher in sodium, so if you’re watching salt intake, consider low-sodium options or smaller portions.
Overall, these sliders strike a nice balance between indulgence and nutrition—honestly, perfect comfort food that doesn’t feel like a total cheat.
Conclusion
In a nutshell, these Savory Italian Sub Sliders are an easy, crowd-pleasing recipe that brings bold Italian flavors to your table with minimal effort. Whether you’re hosting a big game day party or just want a tasty snack that satisfies a crowd, this recipe has you covered.
Feel free to tweak the ingredients or add your favorite toppings to make them truly your own. I love how versatile these sliders are—sometimes I switch up the meats or add extra veggies depending on what’s in the fridge.
If you give this recipe a try, I’d love to hear how you customize it or what sides you pair with your sliders. Drop a comment below or share your game day photos! Here’s to tasty gatherings and easy recipes that bring everyone together.
FAQs
Can I make these sliders ahead of time?
Yes! Assemble the sliders the night before, cover tightly, and refrigerate. Bake fresh before serving for best results.
What if I don’t have Italian dressing?
You can substitute with a simple mix of olive oil, red wine vinegar, garlic powder, and dried herbs.
Can I freeze these sliders?
They freeze best before baking. Wrap tightly and freeze for up to 2 months. Thaw overnight in the fridge before baking.
How do I prevent the buns from getting soggy?
Spread the dressing-mayo mixture sparingly and bake covered with foil to keep moisture balanced. Toasting the sliders briefly after baking helps too.
Are these sliders kid-friendly?
Absolutely! The melty cheese and familiar flavors usually go over well with kids. You can omit onions or pickles if preferred.
Pin This Recipe!
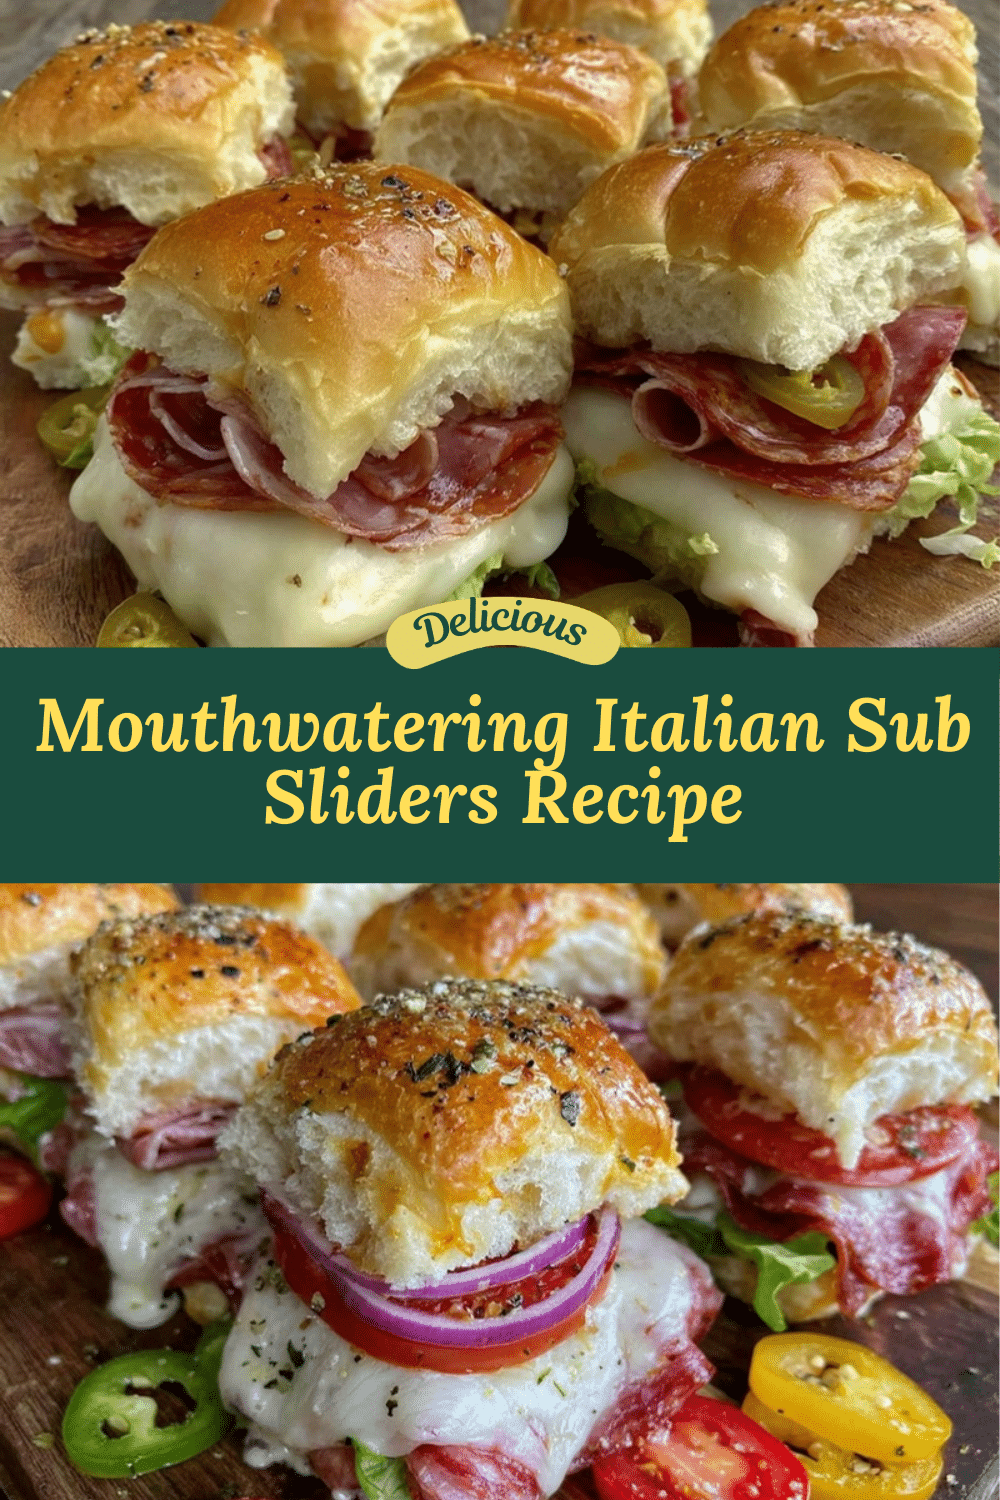

Savory Italian Sub Sliders
- Total Time: 40 minutes
- Yield: 12 servings 1x
Description
These Savory Italian Sub Sliders are an easy, crowd-pleasing recipe perfect for game day or group gatherings, featuring layers of Italian deli meats, provolone cheese, and fresh veggies on soft slider buns.
Ingredients
- 12 soft sandwich rolls or dinner slider buns (Hawaiian rolls preferred)
- 6 oz sliced Genoa salami
- 6 oz sliced ham
- 6 oz sliced pepperoni
- 8 oz provolone cheese, sliced
- 1 cup shredded iceberg lettuce
- 1 large tomato, thinly sliced
- 12 dill pickle slices
- 1/4 cup thinly sliced red onion (optional)
- 1/3 cup Italian dressing
- 2 tablespoons mayonnaise
- 1 teaspoon dried oregano
- 2 tablespoons unsalted butter, melted
Instructions
- Preheat your oven to 350°F (175°C). Lightly grease a 9×13-inch baking dish or line it with parchment paper.
- Slice the slider buns in half horizontally and arrange the bottom halves snugly in the baking dish.
- Mix the Italian dressing and mayonnaise in a small bowl and spread evenly over the bottom halves of each bun.
- Layer the Italian deli meats evenly over the buns, starting with ham, then salami, and finishing with pepperoni.
- Sprinkle dried oregano over the meats.
- Top the meats with provolone cheese slices, covering the meats completely.
- Place the top halves of the slider buns over the cheese and press down gently to compact the layers.
- Brush the tops of the buns with melted butter.
- Cover the baking dish tightly with aluminum foil.
- Bake for 20 minutes, then remove the foil and bake uncovered for another 5 minutes to crisp the tops.
- Remove from oven and let the sliders rest for 5 minutes.
- Lift the top buns and layer shredded lettuce, tomato slices, pickle slices, and red onion (if using). Replace the top buns gently.
- Cut the sliders apart carefully and serve warm.
Notes
To prevent soggy buns, spread the dressing-mayo mixture sparingly and bake covered with foil. Toasting the sliders briefly under the broiler for 1-2 minutes after baking can help crisp the tops without drying out the filling. You can assemble the sliders the night before and bake fresh before serving. For gluten-free options, use gluten-free slider buns or lettuce wraps.
- Prep Time: 15 minutes
- Cook Time: 25 minutes
- Category: Main Course
- Cuisine: Italian
Nutrition
- Serving Size: 1 slider
- Calories: 280
- Sodium: 600
- Fat: 18
- Carbohydrates: 18
- Fiber: 1
- Protein: 15
Keywords: Italian sliders, game day recipe, party food, Italian sub, easy sliders, crowd-pleaser, sandwich recipe